Filtre
Réinitialiser
Trier parPertinence
Care2Adopt
Italian Ciabatta
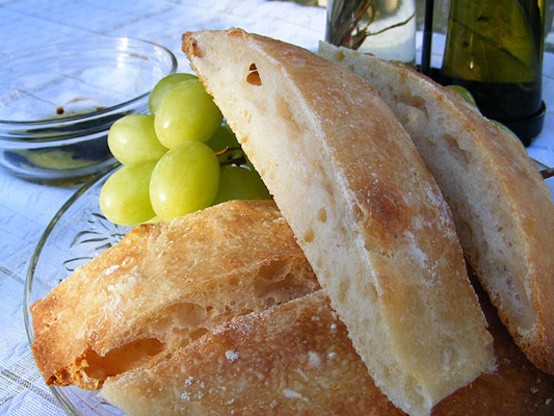
This recipe produces an extremely light, air pocket-riddled loaf, wonderful for dunking in soup or splitting lengthwise, to make a sandwich.The bread begins with an overnight biga ( starter ), which improves both this simple loaf’s texture, and its taste..The use of a biga will also increase the loaf’s shelf life.I found this recipe on King Arthur Flour's site while researching baking with poolish and biga ( starters ).Time includes prefermentation and rise.NOTE: I experimented and baked one loaf ( the one on the right in photo ) as directed and the other ( loaf on the left ) I baked it covered in a Romanetopf Clay Pot.Flavor was very similar but definitely preferred the crust of the loaf that was baked in the clay pot.
Share
Tweet
Pin
Whatsapp
Print
Ingrédients
Préparation
-
BIGA (Italian Starter):.
-
Mix the biga ingredients, in a small bowl until well combinedL.
-
Cover the bowl with plastic wrap and allow to rest for up to 15 hours.
-
It will expand and become bubbly so leave room in the bowl for it to expand.
-
CIABATTA DOUGH:.
-
Place all of the dough ingredients together with the biga into the bowl of your mixer or bread pan of your bread machine.
-
Beat at medium speed ( mixer ) using the flat.beater ( not dough hook ), for 5–8 minutes.
-
The dough will never completely clear the sides of the bowl, though it’ll begin to acquire some shape.The dough will be very wet.
-
Cover the bowl with plastic wrap, and allow the dough to rise for 1–1.5 hours; it will get very puffy.
-
Midway through the rising period, gently deflate the dough and turn it over in the bowl; this will help it rise, and will also strengthen its gluten, making it easier to shape.
-
( Note: If using the dough cycle on bread mahine, check the consistency after 10 minutes ( it should be very tacky, but should be holding its shape somewhat ), adding more flour or water s needed.Midway through the rising period, gently deflate the dough and turn it over in the bowl; this will help it rise, and will also strengthen its gluten, making it easier to shape.Allow the dough to rest an additional 30 minutes after the dough cycle ends ).
-
Which ever method you use. your dough will be wet and sticky, but don't worry, it's suppose to look like that.
-
Transfer the dough to a well-oiled work surface.
-
Lightly grease a large cookie sheet, and your hands.
-
Using a bench knife or your fingers, divide the dough in half.
-
Handling the dough gently,; stretch it into a log centimetre long, and place it on the baking sheet.
-
Flatten the log with your fingers till it’s about is about 25 centimetre long and 114 centimetre wide.
-
Repeat with the remaining piece of dough.
-
Lightly cover the dough with heavily oiled plastic wrap, and allow it to rise for 1 hour.
-
Oil your fingers, and gently poke deep holes all over the dough.
-
Re-oil the plastic wrap, re-cover the dough, and allow it to rise for an additional hour.
-
At this point, the dough will be very puffy; it should jiggle like gelatin when you very gently shake it.
-
Preheat oven to 425 degrees.
-
Spray the loaves very heavily with water, and dust them lightly with flour ( if desired ).
-
Bake for 25–30 minutes, or until they're golden brown.
-
Turn off the oven, remove the ciabatta from the baking sheet, and return them to the oven, propping the oven door open a couple of inches.
-
Allow the ciabatta to cool completely in the oven; this will give them a very crisp crust.
-
Your bread should have large, irregular holes, ideal for trapping the olive oil/balsamic drizzle.
Blogs qui pourraient être intéressants
-
 240 minPains à la levureeau, pétrole, sirop d'érable, sel, graines de coquelicot, farine, Levure, Orange,pain d'érable aux graines de pavot (abm)
 -
 270 minPains à la levureL'avoine, semoule de maïs, farine, beurre, mélasse, sel, pétrole, Levure, farine,pain de guerre
 -
 30 minPains à la levureLevure, eau F F, l'eau glacée, sucre, sel, assaisonnement, pétrole, farine,pâte à pizza new-yorkaise
 -
 145 minPains à la levuresucre, sel, farine, Levure, Oeuf, Lait, beurre, beurre, cannelle, sucre, noix de pécan, sucre, Lait, beurre, vanille,machine à pain à la levure café (abm)
J'ai adoré
